<%@LANGUAGE="JAVASCRIPT" CODEPAGE="1252"%> Micklem Multibridle


ZARA PHILLIPS AND HIGH KINGDOM IN OLYMPICS GAMES
Team Silver Medal & 8th individual
 

7 competition micklembridle insideout purchase articles
Micklem MultibridlE

Three Main Pieces

The Rambo® Micklem Multibridle is three main pieces
of equipment in one.

1. A BRIDLE (including integral noseband)

2. A LUNGE CAVESSON

3. A BITLESS BRIDLE (3 alternatives)
And features the unique tongue and bars of the mouth protection system, which has proved effective for so many horses.


HOW TO FIT AND USE BRIDLE

1. BRIDLE
Fitting the Bit Straps

Fit the bit straps to your bit first, with the buckle on the outside and the end of the strap facing upwards, then attach to the Multibridle (Figure 4) using the bit rings at the bottom of the cheek pieces. For some varieties of bits with long sides a shorter attachment than the bit straps may be needed, in which case one of the set of clips should be used. (Figure 5)
figure4   figure5
Figure 4 . Micklem Multibridle   Figure 5 . Bit Clips

Positioning the Front Nose Piece

The key to fitting your Rambo® Micklem Multibridle is to ensure that the front nosepiece is approx 2 to 3 inches higher than the corners of the mouth and at least six fingers above the nostrils. To confirm you have the right position, put your fingers either side of the nose at this point and you will be able to locate where the fragile ends of the nose bones begin. (figure 1)
The front nosepiece should not be below this point. Then use both the cheek pieces and the bit straps or clips to fit your bit at the normal height.

Doing the Top Back Straps

This should be fastened flush with the skin, not loose like a throat latch, so that it holds the bridle in place. It will sit naturally on the cheek-bones at approximately 45 degrees to the vertical.

Doing the Bottom Back Straps

This fits like a standard dropped noseband, underneath the bit and flush with the skin. This fitting actually allows the horse freedom to open the mouth a little, but when this happens the bit will rise up encouraging the mouth to close.

Fitting the Tongue and Bar Protector

Use the appropriate length clips to join the bit to the side rings and you have a unique tongue and bar protection system. (figure 4) If a rider gets left behind, or a horse and rider pull against each other, the clips will shift the extra pressure to the nose rather than on to the tongue or the very narrow bars of the mouth. (figure 6)
This is a similar action to the Australian racing noseband. This will help the horse to accept the bit quietly and discourage them from putting the tongue over the bit. It is also very useful for novice riders who have not yet learnt to go with the motion of the horse.
figure6
Figure 6 . The sharp narrow bars are located on the bottom jaw.

2. LUNGE CAVESSON


The bridle, as fitted above, can be used as a classical lunge cavesson (figure 7) by simply attaching a lunge line to the ring provided on the nose piece. When using side reins or running reins, which by their nature are relatively fixed, the tongue protection system using the clips is a huge advantage. It may be necessary to tighten the top back strap by one hole in some circumstances where ex-tra security is required.
figure7
Figure 7 . Lunge Cavesson

3. BITLESS BRIDLE

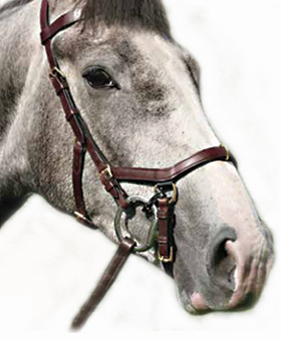
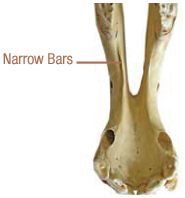
There are three alternative bitless bridles, from mild to strong, so there will be one that suits your horse and they all avoid the extreme da-mage to the molar teeth caused by standard bitless bridles. They are great to use after any mouth damage such as split corners or if your horse dislikes a bit. Some may wish to use a bitless bridle on a continuous basis and the stronger alternative is ideal for this. It has been proved to work wonderfully well over many years.

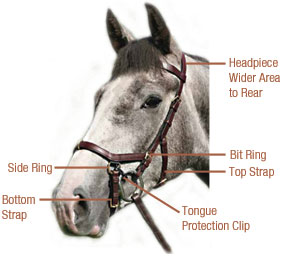
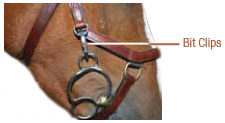
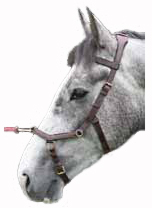
. Mild (figure 8) - Take out the bit by undoing the bit straps or clips and attach the reins directly to the side rings and you ha-ve a mild bitless bridle.

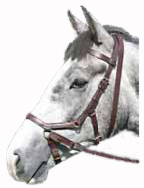
. Medium (figure 9) - Add the curb groove attachment by fitting it under the bottom back strap, like a curb chain. You need to open the lower back strap of the Multibridle when doing this.
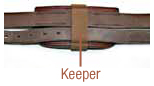
Fit the lower back strap though the keeper (figure 10) at the back of the curb groove attach-ment before doing this strap up again. Then bring the side straps of this attachment back through the side rings of the Multibridle, before attaching the reins to the end of these side straps.

figure8 figure9 figure10
Figure 8 . Mild Figure 9. Medium Figure 10

.
Strong (figure 11) - Take the long strap and bring it through the keeper (figure 10) at the top of the headpiece. Centre this strap, then cross it diagonally at the back of the head and bring it out through the side rings, before attaching the reins to the ends of this long strap.
figure11   figure12
Figure 11 . Bitless Bridle Strong   Figure 12 . Headcollar

HEADCOLLAR

There's even more added value to the Rambo® Micklem Multibridle. It's not just a bridle, a noseband, a lunge cavesson and a bitless bridle, it's also a headcollar (figure 12), enabling you to buy just one product instead of five.
It is important that when you are using the Multibridle as a Headcollar, or when the bit is attached, the side rings are the per-fect place to attach cross ties safely.

Fitting Head Collar
Just take off the bit or bitless bridle attachment and loosen the back straps and it is a headcollar for travelling to competi-tions or for use during long distance rides.